이미지맵(image map) : 한이미지를 여러 개의 구역으로 나누어 링크를 거는 것


- 사각형 이미지맵

1. 기본 구조

<img src="이미지경로" alt="" usemap="#coupon">
<map name="coupon">
	<area 
    	shape="rect" 
        coords="132,795,607,897" 
        href="#" 
        title="다운로드 기간 : 2월 31일까지" 
        alt=""
     >
</map>

이미지맵을 적용할 img에 usemap속성을 사용하여 이미지맵의 이름을 지정하기

map태그를 사용하여 이미지맵을 만들기

// <img usemap="#coupon">, <map name="coupon"></map>


map 태그안에 area태그 필요 

  shape="rect | circle | poly" // 사각형, 원형, 다각형 정하기

  coords="왼쪽상단x좌표,y좌표,오른쪽상단x좌표,y좌표"

  href="#" // 클릭시 연결할 페이지 또는 html문서 등등 

  title="쿠폰 다운로드" // 호버시 툴팁 


2. coords="" 에서 좌표값 얻는법 

그림판 > 선택 클릭 


왼쪽상단과 오른쪽하단에 커서를 놓으면 밑에 좌표가 뜬다.

왼쪽 상단 xy좌표 131,352

오른쪽하단 xy좌표 607,454

coords="131,352,607,454"
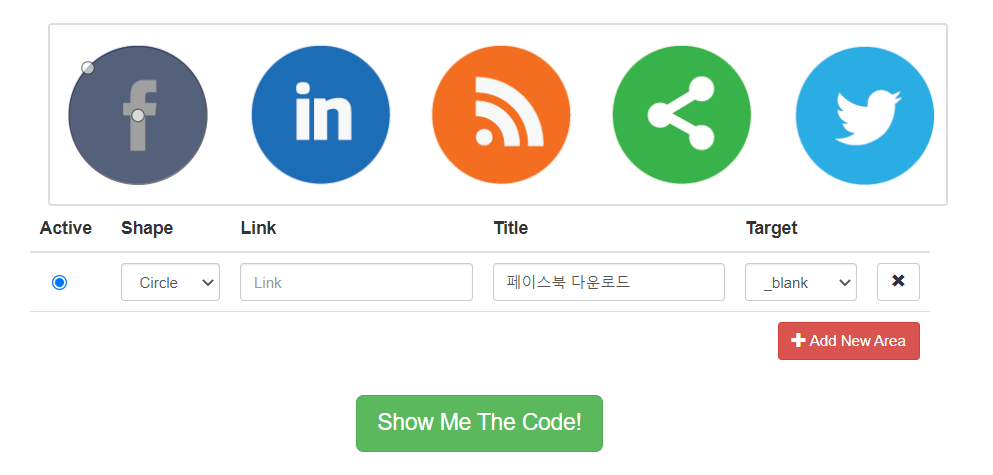


- 원형 이미지맵

<img src="./images/icon/ico_sns_row1.png" alt="" usemap="#sns_list">
<map name="sns_list">
	<area shape="circle" coords="87,84,68" href="https://www.facebook.com" 
      alt="" title="페이스북 다운로드">
	<area shape="circle" coords="270,84,68" href="https://kr.linkedin.com" 
      alt="" title="링크드인 다운로드">
	<area shape="circle" coords="455,84,68" href="#" 
      alt="" title="RSS">
	<area shape="circle" coords="636,84,68" href="#" 
      alt="" title="공유하기">
	<area shape="circle" coords="823,84,68" href="https://twitter.com/" 
      alt="" title="트위터 다운로드">
</map>


1. 좌표

원의 중앙xy좌표, 원의 반지름 

사각형 좌표랑 똑같이 그림판에서 원의 중앙 좌표를 찍고 

반지름은 선을 그려서 2로 나눈다.


** 좌표를 찾을 때 그림판말고도 image map generator 를 검색해보면 많은 무료 사이트들이 있다.

https://www.image-map.net/


Free Online Image Map Generator

Easy free online html image map generator. Select an image, click to create your areas and generate html your output!

www.image-map.net

부모 :  color: red;

자식 :  color: inherit; // 컬러는 디폴트가  inherit (상속된다)

 div는 블럭요소, 디폴트값이 width 100% 라서 width: inherit;이 필요없다.

 부모안에 자식을 가득차게 : height: inherit;


img는 인라인요소, 부모에 가득차게 하려면 width height에 inherit;

<div class="inherit-exam">
 <h1>부모요소의 값을 상속하는 inherit</h1>
 <div class="parent">
  <div class="child">자식요소</div>
 </div>

 <div class="parent2">
  <img src="./images/animal/red_panda.jpeg" al="red_panda">
 </div>
 </div>
.inherit-exam {
	border: 1px solid #000;
	padding: 0 100px;
}
.parent {
	border: 3px solid #000;
	width: 400px;
	height: 200px;
	background-color: olive;
	color: red;
}

.child {
	border: 1px solid red;
	height: inherit; /* 200px */
	/* border값 만큼 넘치게 된다. */

	background-color: yellow;
	color: inherit; /* 디폴트 */
}

.parent2 {
	border: 2px solid #000;
	margin: 10px 0;
	width: 400px;
	height: 300px;
}
.parent2 img {
	width: inherit;
	height: inherit;
}

em : 부모 기준

rem : root 기준 


font-size: 16px; == 1em == 100%


<div class="box-em">
 <h1>em : 상대적인 폰트(부모기준으로 상대적)</h1>
 <p>
	곧 너의 뭇 방황하였으며, 봄바람이다. 아름답고 이상의 끝에 것이다. 
    인도하겠다는 불어 피가 인간은 불어 풀이 봄바람이다. 
    얼음 청춘 심장의 없으면, 날카로우나 원대하고, 끝에 피다. 
    있을 청춘의 무엇을 돋고, 과실이 교향악이다. 어디 쓸쓸한 
    발휘하기 위하여 끝에 거선의 구할 아니다. 우는 것이 이상을 따뜻한 
    천고에 투명하되 사막이다. 목숨이 인도하겠다는 사는가 쓸쓸하랴? 
    얼음과 않는 없으면, 주며, 때문이다.
 </p>
</div>

<div class="box-rem">
 <h1>rem : 가장 상위요소(html)기준</h1>
 <p>
	곧 너의 뭇 방황하였으며, 봄바람이다. 아름답고 이상의 끝에 것이다. 
    인도하겠다는 불어 피가 인간은 불어 풀이 봄바람이다. 
    얼음 청춘 심장의 없으면, 날카로우나 원대하고, 끝에 피다. 
    있을 청춘의 무엇을 돋고, 과실이 교향악이다. 어디 쓸쓸한 
    발휘하기 위하여 끝에 거선의 구할 아니다. 우는 것이 이상을 따뜻한 
    천고에 투명하되 사막이다. 목숨이 인도하겠다는 사는가 쓸쓸하랴? 
    얼음과 않는 없으면, 주며, 때문이다.
 </p>
</div>
body {
 font-size: 16px;
 }
.box-em {
 font-size: 20px;
}
.box-em p {
 /* 1em => 부모(.box-em)이 fz20 이기때문에 20px이다. */
 font-size: 1em;
			
 /* 30px */
 line-height: 1.5em;
}

.box-rem {
 /* root가 16px, 16*1.25 == 20px */
 font-size: 1.25rem;
}


바디 : 16px


div.box-em : 20px 

    div > p : 1em (부모 20픽셀기준으로 p는 20픽셀이다)


div.box-rem : 1.25rem

( 최상위 요소(html)기준으로 16*1.25 == 20px)


1. 인라인요소 :  크기는 컨텐츠의 너비값

- 한줄에 여러개 배치, 상하마진 못가짐, 기본 너비값은 컨텐츠의 너비값

- span, a, small, em, b, br, audio, video, s, u, mark, q, strong, sup, sub, i, big, del, label

(서식을 꾸미는 요소)


2. 블록요소 : 크기값 지정가능 

- 크기값을 지정할 수 있음, 한줄에 한개만 배치, 상하좌우마진 모두 가짐, 기본 너비값은 100%

- div, ul, ol, li, h, hr, form, dl, dt, dd, p, table, header, article, footer, section, nav, details, summury, center,


3. 인라인블록 : 크기값 지정가능, 기본크기는 컨텐츠의 너비값

한줄에 여러개 배치

상하좌우마진 모두 가짐

- img, input, button, fontawesome icon


기본값 position: static;


어떤 요소이건 position: absolute 또는 fixed가 적용되면 인라인블록으로 변함.

before after는 기본적으로 인라인요소


absolute 일 때 display: inline-block;을 또 쓸 필요 x


		.main_txt {
			position: relative;
			display: inline-block;
		}
		.main_txt:after {
			content: '';
			position: absolute;
			width: 100%;
			height: 5px;
			left: 0;
			bottom: 0;
			background: orange;
		}

'Web > HTML CSS 퍼블리싱' 카테고리의 다른 글

부모요소의 값을 상속하는 inherit  (0) 2022.02.07
폰트사이즈 em, rem 정리  (0) 2022.02.07
Hamburger Menu (+, ~ 선택자 이용)  (0) 2021.07.22
iframe, a target속성  (0) 2021.07.22
앵커 (anchor) 만들기  (0) 2021.07.22

- 인접선택자 + : 바로 밑 요소 (자기보다 위의 요소는 x)

    1. ul + p 
    <ul>
        <li>목록1</li>
        <li>목록2</li>
        <li>목록3</li>
    </ul>
    <p>문단입니다.</p>
    <p>문단입니다.</p>
ul + p {
    color: hotpink;
}

ul의 바로 밑 p만 색이 변한다.


- 형제선택자 ~ : 형제요소만 선택 

ul ~ p

ul 밑에 형제p만 선택된다.

    2. ul ~ p 
    <ul>
        <li>목록1</li>
        <li>목록2</li>
        <li>목록3</li>
    </ul>
    <p>문단입니다.</p>
    <p>문단입니다.</p>
    <div>
        <p>문단입니다.</p>
    </div>
ul ~ p {
    color: blue;
}


- 햄버거 버튼 클릭시 엑스 

input:checked (클릭 시) label 디자인 

    <!-- 햄버거 버튼 , 사이드 바  -->
    <div class="inner">
        <input type="checkbox" id="trigger">
        <label for="trigger">
            <span></span>
            <span></span>
            <span></span>
        </label>
        <div class="sidebar"></div>
    </div>


.inner {}
.inner input[id="trigger"] {
    display: none;
}

/* 버튼 클릭 시 엑스모양 */
.inner input[id="trigger"]:checked + label span:nth-child(1) {
    top: 50%;
    transform: rotate(45deg);
}
.inner input[id="trigger"]:checked + label span:nth-child(2) {
    opacity: 0;
}
.inner input[id="trigger"]:checked + label span:nth-child(3) {
    top: 50%;
    transform: rotate(-45deg);
}

/* 버튼 클릭 -> 사이드바 left-250에서 0으로 나타나게 */
.inner input[id="trigger"]:checked ~ .sidebar {
    left: 0;
}
/* 버튼 클릭 -> 
엑스 위치 조절하기위해서 라벨을 relative에서 absolute로 변경 */
.inner input[id="trigger"]:checked + label {
    left: 210px; 
}
label[for="trigger"] {
    position: absolute;
    top: 20px;
    left: 10px;    
    display: inline-block;
    width: 30px;
    height: 20px;
    cursor: pointer;
    transition: 0.3s;
    /* border: 1px solid #000; */
}

/* 햄버거버튼 */
label[for="trigger"] span {
    position: absolute;
    display: block;
    width: 100%;
    height: 2px;
    left: 0;
    background-color: #000;
    transition: 0.3s;
    z-index: 1;
}
label[for="trigger"] span:nth-child(1) {
    top: 0;
}
label[for="trigger"] span:nth-child(2) {
    top: 50%;
}
label[for="trigger"] span:nth-child(3) {
    top: 100%;
}

.sidebar {
    position: fixed;
    top: 0;
    left: -250px;
    width: 250px;
    height: 100vh;
    background-color: pink;
    transition: 0.3s;
}

'Web > HTML CSS 퍼블리싱' 카테고리의 다른 글

폰트사이즈 em, rem 정리  (0) 2022.02.07
display 속성의 이해 (인라인, 인라인블록, 블록)  (0) 2022.02.03
iframe, a target속성  (0) 2021.07.22
앵커 (anchor) 만들기  (0) 2021.07.22
login form #2  (0) 2021.07.21

iframe : html body안에서 또다른 html이나 url을 불러와 심는 것이다.

src안에는 .html .com .jpg .txt등 웹브라우저가 보여줄 수 있는 파일 확장자는 다 가능하다.

    <iframe src="test.html"></iframe>


   // test.html
    <h1>Test page</h1>
    <a href="https://www.Inflearn.com" 
    	target="_parent">인프런 홈페이지 바로가기</a>


target="_self" : 기본값, 자기자신의 창에서 열기

target="_blank" : 새창 열기

target="_parent" : 프레임을 무시하고 부모위치에서 띄운다. 


+ Recent posts